varnish
引言
varnish是一款高性能的开源的方向代理服务器和http加速器。
安装部署
1
2
3
4
5
useradd -s /sbin/nologin varnish mkdir /data/vanish/cache -pv mkdir /data/vanish/log chown -R varnish:varnish /data/vanish/cache/ chown -R varnish:varnish /data/vanish/log/
源码安装
1
2
3
4
5
6
7
8
9
10
11
12
13
14
15
16
17
18
19
20
21
22
sudo yum install \ make \ autoconf \ automake \ jemalloc-devel \ libedit-devel \ libtool \ ncurses-devel \ pcre-devel \ pkgconfig \ python3-docutils \ python3-sphinx yum install graphviz yum install git cd varnish sh autogen.sh sh configure make make test make install
从源安装(推荐)
1
2
3
4
5
6
7
8
9
10
11
12
13
14
15
16
17
18
19
20
21
22
23
24
25
26
创建varn.repo [varnishcache_varnish60lts] name=varnishcache_varnish60lts baseurl=https://packagecloud.io/varnishcache/varnish60lts/el/6/$basearch repo_gpgcheck=1 gpgcheck=0 enabled=1 gpgkey=https://packagecloud.io/varnishcache/varnish60lts/gpgkey sslverify=1 sslcacert=/etc/pki/tls/certs/ca-bundle.crt metadata_expire=300 [varnishcache_varnish60lts-source] name=varnishcache_varnish60lts-source baseurl=https://packagecloud.io/varnishcache/varnish60lts/el/6/SRPMS repo_gpgcheck=1 gpgcheck=0 enabled=1 gpgkey=https://packagecloud.io/varnishcache/varnish60lts/gpgkey sslverify=1 sslcacert=/etc/pki/tls/certs/ca-bundle.crt metadata_expire=300 yum clean all yum makecache yum install varnish
初步配置
1
2
3
4
5
6
7
8
9
10
11
12
13
14
# 开启服务 service varnish start # 默认从rack-leen.top的80端口中拉取数据缓存 varnish可以定义几个backend,并将其加入负载均衡 /etc/varnish/default.vcl backend default { .host = "rack-leen.top"; .port = "80"; } # 更改监听端口 # 原理: varnish相当于一堵墙,用户请求的时候是先经过varnish,如果其后是varnish代理用户拉取目标服务器的数据,因此用户访问的是varnish服务器 /etc/varnish/varnish.params # 将监听端口改为需要访问的端口 VARNISH_LISTEN_PORT=6081
注意
varnish6.3依赖systemed python3
varnish默认只缓存get和head请求
原理解析
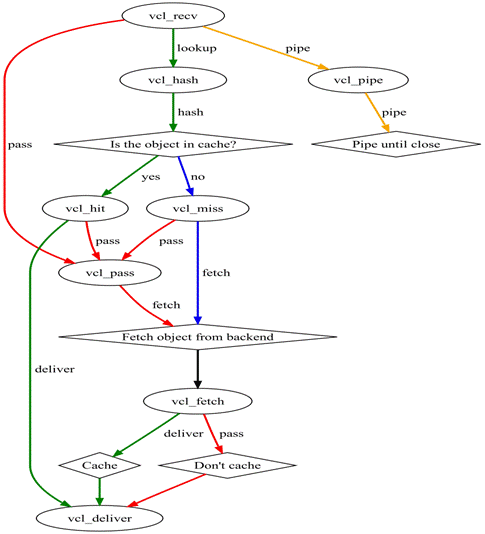
pipe,用户将请求直接传递至后端主机,在请求和返回的内容没有改变的情况下,将不变的内容返回给客户端,直到这个链接被关闭。
pass,直接拉取backend服务器数据。
本地查询,查询varnish服务器中是否存在缓存
拉取(fetch)backend中的服务器数据。然后判断是否缓存,如果不缓存,直接将服务器数据传给客户端,如果缓存,则先将数据缓存到varnish,再发送给客户端。
使用vcl编写配置
编写/etc/varnish/default.vcl下载
1
2
3
4
5
6
7
8
9
10
11
12
13
14
15
16
17
18
19
20
21
22
23
24
25
26
27
28
29
30
31
32
33
34
35
36
37
38
39
40
41
42
43
44
45
46
47
48
49
50
51
52
53
54
55
56
57
58
59
60
61
62
63
64
65
66
67
68
69
70
71
72
73
74
75
76
77
78
79
80
81
82
83
84
85
86
87
88
89
90
91
92
93
94
95
96
97
98
99
100
101
102
103
104
105
106
107
108
109
110
111
112
113
114
115
116
117
118
119
120
121
122
123
124
125
126
127
128
129
130
131
132
133
134
135
136
137
138
import directors; import std ; # 访问控制,清理varnish缓存的角色 acl purge { "127.0.0.1"; "localhost"; } # 需要请求的目标服务器 backend default { .host = ""; .port = ""; } backend nginx1 { .host = ""; .port = ""; } backend nginx2 { .host = ""; .port = ""; } # 刚开始初始化的方法 sub vcl_init { new bar = directors.round_robin(); # 创建负载均衡的服务器组,采用轮询方式 bar.add_backend(nginx1) ; bar.add_backend(nginx2) ; } # 接收方法 sub vcl_recv { set req.backend_hint = bar.backend() ; # 接收请求命中的服务器是bar组中的服务器 if (req.method == "PURGE") { # 清理缓存 if (!client.ip ~ purge) { # 如果不是本机,不能清理缓存 return (synth(405 , "This IP is not allowed to send PURGE requests.")); } return (purge) ; } # 如果不是这些方法,就使用pipe模式,直接与服务器连接,直到pipe连接关闭 if (req.method != "GET" && req.method != "HEAD" && req.method != "PUT" && req.method != "POST" && req.method != "TRACE" && req.method != "OPTIONS" && req.method != "PATCH" && req.method != "DELETE") { return (pipe) ; } # 如果请求方法不是GET和HEAD,就直接访问服务器拉取数据,因为GET和HEAD访问的比较频繁,而且获取的内容相同,需要做缓存 if (req.method != "GET" && req.method != "HEAD") { return (pass) ; } # 如果请求的是大文件,就不要把它放到cookie里面了 if (req.url ~ "^[^?]*\.(bmp|bz2|css|doc|eot|flv|gif|gz|ico|jpeg|jpg|js|less|pdf|png|rtf|swf|txt|woff|xml)(\?.*)?$") { unset req.http.Cookie ; # 先本地查询 return (hash) ; } # 没有足够权限获取缓存,就直接拉取 if (req.http.Authorization) { return (pass) ; } # 如果是上诉其他情况,请求之后,就进入本地查询 return (hash) ; } # 管道直连,直到pipe关闭,连接才关闭 sub vcl_pipe { return (pipe) ; } # 将请求进行hash算法,得到唯一值 sub vcl_hash { hash_data(req.url); # 获取请求url的hash if (req.http.host) { # 如果请求的是域名 hash_data(req.http.host); }else { # 否则直接使用主机ip hash_data(server.ip) ; } # 如果存在cookie if (req.http.Cookie) { hash_data(req.http.Cookie) ; } } # 命中varnish 中的缓存 sub vcl_hit { return (deliver) ; # 命中之后就直接返回给客户端 } sub vcl_miss { std,log("url miss! the url= " + req.url) ; # 输出未命中的url return (fetch) ; # 如果没有缓存,就拉取服务器的数据 } # 这个函数可以设置缓存生命周期 sub vcl_backend_response { # 如果被请求的是大文件 if (bereq.url ~ "^[^?]*\.(bmp|bz2|doc|eot|flv|gif|gz|ico|jpeg|jpg|less|mp[34]|pdf|png|rar|rtf|swf|tar|tgz|txt|wav|woff|xml|zip)(\?.*)?$") { unset beresp.http.set-cookie ; # 取消设置缓存 set beresp.ttl = 1h ; # 设置生命周期为1小时 } # 如果请求的是静态文件 if (bereq.url ~ "^[^?]*\.(css|js|html)(\?.*)?$") { set beresp.ttl = 10m ; # 设置生命周期为10分钟 } if (beresp.ttl <= 0s || beresp.http.Set-Cookie || beresp.http.Vary == "*") { set beresp.ttl = 120s ; set beresp.uncacheable = true ; # 设置不缓存 return (deliver) ; } set beresp.grace = 1h; return (deliver) ; } sub vcl_deliver { if (obj.hits > 0) { # 如果命中缓存次数大于0,表示varnish中有缓存,直接使用缓存 set resp.http.X-Cache = "Cache" ; }else { # 否则就从目标服务器拉取数据 set resp.http.X-Cache = "UnCache" ; } return (deliver) ; # 最终返回客户端 }
测试
1
2
3
4
5
6
7
8
9
10
11
12
13
14
15
16
17
18
19
20
21
22
23
24
25
26
27
28
29
30
31
32
33
34
35
36
37
38
39
40
41
42
43
44
45
curl -I rack-leen.top:6081 # 首次获取header信息 HTTP/1.1 200 OK Date: Thu, 31 Oct 2019 09:47:07 GMT Server: Apache X-Frame-Options: SAMEORIGIN Last-Modified: Mon, 29 Jul 2019 10:16:47 GMT Vary: Accept-Encoding Content-Type: text/html X-Varnish: 98307 Age: 0 Via: 1.1 varnish-v4 ETag: W/"2602a-58ecf3085c1c0-gzip" X-Cache: UnCache # 这里表示varnish还没有缓存,直接拉取的目标服务器数据 Connection: keep-alive curl -I rack-leen.top:6081 # 再次获取header信息 HTTP/1.1 200 OK Date: Thu, 31 Oct 2019 09:10:48 GMT Server: Apache X-Frame-Options: SAMEORIGIN Last-Modified: Mon, 29 Jul 2019 10:16:47 GMT Vary: Accept-Encoding Content-Type: text/html X-Varnish: 65555 65551 Age: 2117 Via: 1.1 varnish-v4 ETag: W/"2602a-58ecf3085c1c0-gzip" X-Cache: Cache # 之前已经将信息缓存下来,这里已经开始访问缓存 Connection: keep-alive curl -X PURGE rack-leen.top:6081 # 清除缓存 <!DOCTYPE html> <html> <head> <title>200 Purged</title> </head> <body> <h1>Error 200 Purged</h1> <p>Purged</p> <h3>Guru Meditation:</h3> <p>XID: 32778</p> <hr> <p>Varnish cache server</p> </body> </html>


