目录
  1. 1. SSM项目整合与发布
    1. 1.1. 创建SSM项目
    2. 1.2. 创建配置文件
    3. 1.3. 创建各个java文件
      1. 1.3.1. 创建com.deployee.pojo包
      2. 1.3.2. 创建com.deployee.mapper包
      3. 1.3.3. 创建com.deployee.service包
      4. 1.3.4. 创建com.deployee.service.impl包
      5. 1.3.5. 创建com.deployee.controller包
    4. 1.4. 本地测试
      1. 1.4.1. 创建jsp文件
    5. 1.5. SSM项目部署到远端服务器
      1. 1.5.1. 配置pom文件
      2. 1.5.2. 编译项目
      3. 1.5.3. 复制war包到远端
      4. 1.5.4. 远端测试
SSM项目整合与发布

SSM项目整合与发布

创建SSM项目

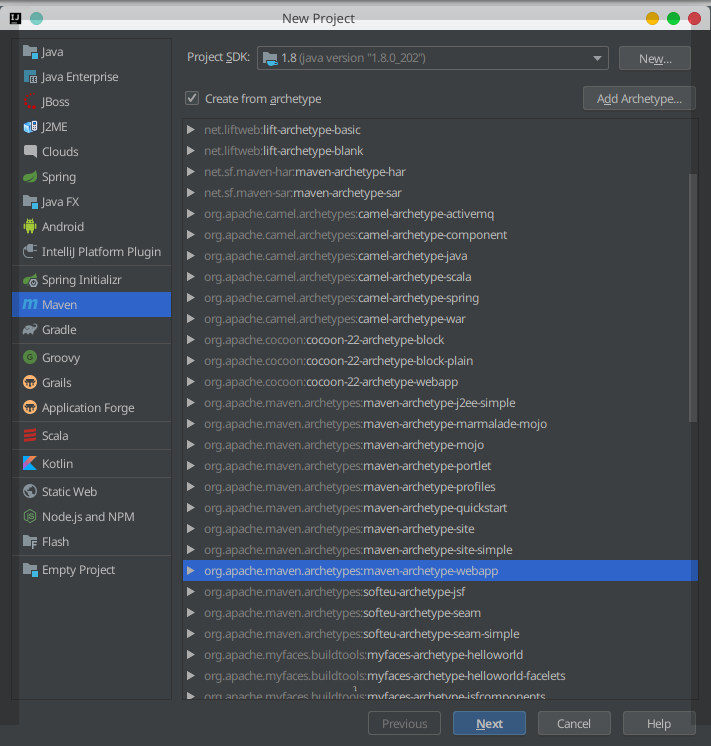
  1. 选择Maven项目类型,选择webapp(选中的那一项)
    deployee1
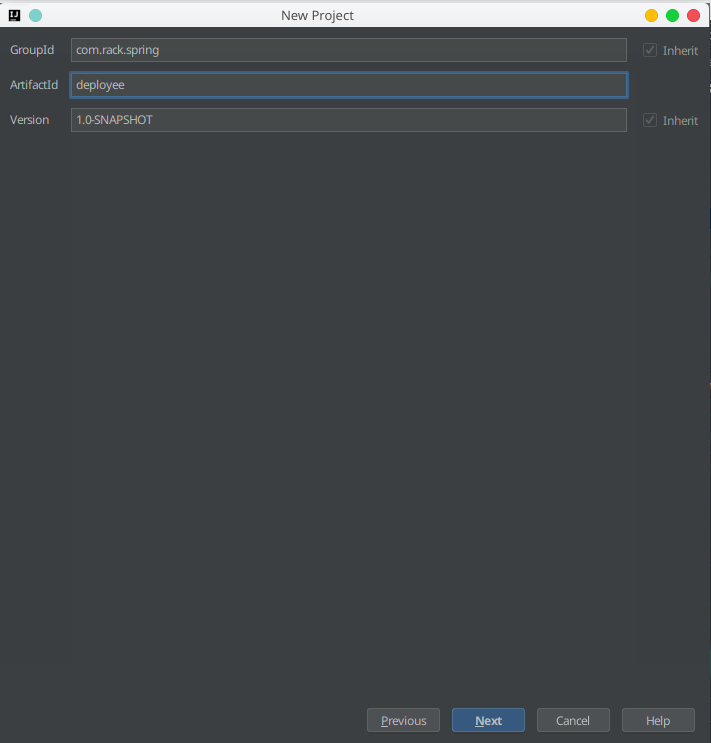
  2. 填入自己项目组id,一般为com.xxx.xxx;填入项目id,也就是项目名
    deployee2
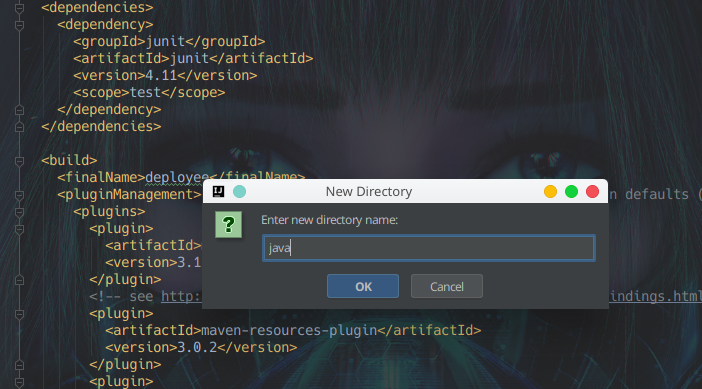
  3. 项目创建成功之后,创建java源代码目录,在src中的main目录下创建
    deployee3
  4. 创建resources目录(存放配置文件),也是在src中的目录下创建
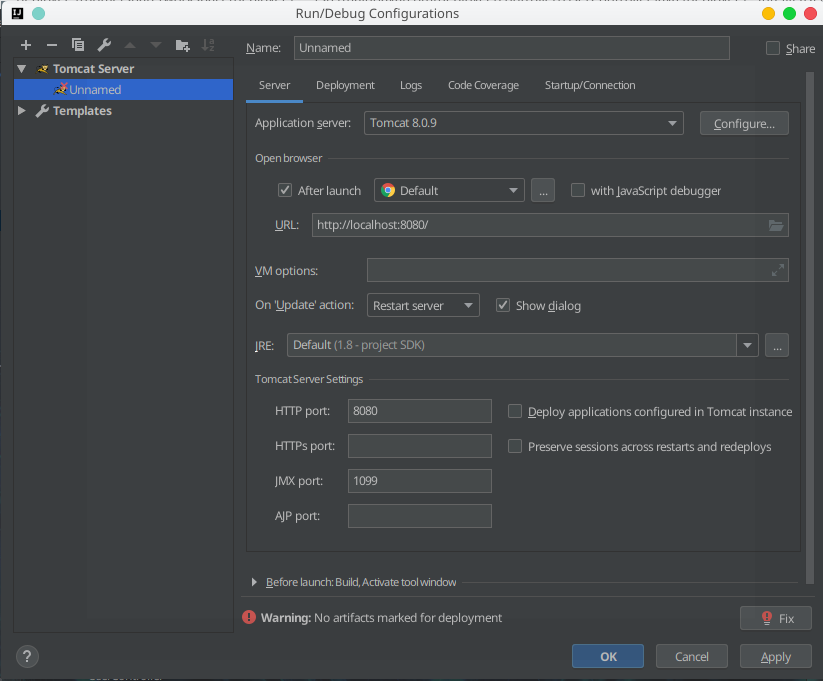
  5. 配置tomcat,点击+,选择tomcat server->local,创建一个本地tomcat,也可以创建一个远程tomcat(选择remote)
    open browser选择浏览器
    deployee4
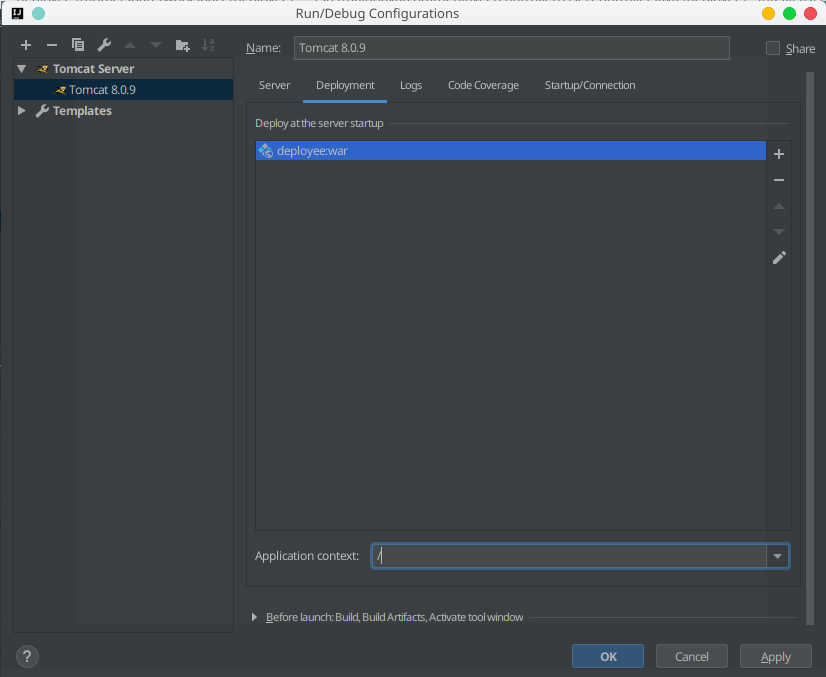
  6. 进入deployment中,点击右边的+,选择第一个选项,得到途中选中的一项
    deployee5

创建配置文件

  • 创建web配置文件(web.xml)
1
2
3
4
5
6
7
8
9
10
11
12
13
14
15
16
17
18
19
20
21
22
23
24
25
26
27
28
29
30
31
32
33
34
<!DOCTYPE web-app PUBLIC
"-//Sun Microsystems, Inc.//DTD Web Application 2.3//EN"
"http://java.sun.com/dtd/web-app_2_3.dtd" >

<web-app>
<display-name>Archetype Created Web Application</display-name>

<!--配置Spring-->
<context-param>
<param-name>contextConfigLocation</param-name>
<param-value>classpath:bean-*.xml</param-value>
</context-param>

<!--监听器-->
<listener>
<listener-class>org.springframework.web.context.ContextLoaderListener</listener-class>
</listener>

<!--配置Spring mvc-->
<servlet>
<servlet-name>DispatcherServlet</servlet-name>
<servlet-class>org.springframework.web.servlet.DispatcherServlet</servlet-class>
<init-param>
<param-name>contextConfigLocation</param-name>
<param-value>classpath:spring-mvc.xml</param-value>
</init-param>
<load-on-startup>1</load-on-startup>
</servlet>

<servlet-mapping>
<servlet-name>DispatcherServlet</servlet-name>
<url-pattern>*.action</url-pattern> <!--Spring mvc默认后缀为action-->
</servlet-mapping>
</web-app>
  • 创建数据库信息配置文件(db.properties)
1
2
3
4
jdbc.driver=com.mysql.jdbc.Driver
jdbc.url=jdbc:mysql://127.0.0.1:3306/ssmdb?characterEncoding=utf-8
jdbc.username=root
jdbc.password=root
  • 创建springmvc配置文件(spring-mvc.xml)
1
2
3
4
5
6
7
8
9
10
11
12
13
14
15
16
17
18
19
20
21
22
23
24
25
26
27
28
29
30
31
32
33
34
35
36
37
38
39
40
41
42
43
44
45
46
47
48
49
50
51
52
53
54
55
56
57
58
59
60
61
62
<?xml version="1.0" encoding="UTF-8"?>
<beans xmlns="http://www.springframework.org/schema/beans"
xmlns:xsi="http://www.w3.org/2001/XMLSchema-instance"
xmlns:p="http://www.springframework.org/schema/p"
xmlns:context="http://www.springframework.org/schema/context"
xmlns:aop="http://www.springframework.org/schema/aop"
xmlns:tx="http://www.springframework.org/schema/tx"
xmlns:mvc="http://www.springframework.org/schema/mvc"
xsi:schemaLocation="http://www.springframework.org/schema/beans
http://www.springframework.org/schema/beans/spring-beans-4.0.xsd
http://www.springframework.org/schema/context
http://www.springframework.org/schema/context/spring-context-4.0.xsd
http://www.springframework.org/schema/aop
http://www.springframework.org/schema/aop/spring-aop-4.0.xsd
http://www.springframework.org/schema/tx
http://www.springframework.org/schema/tx/spring-tx-4.0.xsd
http://www.springframework.org/schema/mvc
http://www.springframework.org/schema/mvc/spring-mvc.xsd">

<!--扫描控制器-->
<context:component-scan base-package="com.deployee.controller"></context:component-scan>


<!--配置一个bean-->
<bean class="org.springframework.web.servlet.mvc.annotation.AnnotationMethodHandlerAdapter">
<property name="messageConverters">
<ref bean="httpMessageConverter"/><!--为其他注解配置id为httpMessageConverter的消息转换器-->
</property>
</bean>

<!--配置一个请求的适配器-->
<bean class="org.springframework.web.servlet.mvc.method.annotation.RequestMappingHandlerAdapter">
<property name="messageConverters">
<ref bean="httpMessageConverter"/> <!--为requestMapper注解配置id为httpMessageConverter的消息转换器-->
</property>
</bean>

<!--配置消息转换器-->
<!--将消息转换为json格式-->
<bean id="httpMessageConverter" class="com.alibaba.fastjson.support.spring.FastJsonHttpMessageConverter">
<property name="supportedMediaTypes">
<list>
<bean class="org.springframework.http.MediaType">
<constructor-arg index="0" value="application"/><!--作用于application(整个项目)-->
<constructor-arg index="1" value="json"/><!--消息格式为json-->
<constructor-arg index="2" value="UTF-8"/><!--消息编码为utf-8-->
</bean>
</list>
</property>
</bean>

<bean class="org.springframework.web.servlet.view.InternalResourceViewResolver">
<property name="prefix" value="/WEB-INF/jsp/" />
<property name="suffix" value=".jsp" />
</bean>

<!--注册注解驱动-->
<mvc:annotation-driven>

</mvc:annotation-driven>
<mvc:default-servlet-handler></mvc:default-servlet-handler>
</beans>
  • 创建mybatis配置文件(bean-mybatis.xml)
1
2
3
4
5
6
7
8
9
10
11
12
13
14
15
16
17
18
19
20
21
22
23
24
25
26
27
28
29
30
31
32
33
34
35
36
37
38
39
40
41
42
43
44
45
46
47
48
49
50
51
52
53
54
55
56
57
58
<?xml version="1.0" encoding="UTF-8"?>
<beans xmlns="http://www.springframework.org/schema/beans"
xmlns:xsi="http://www.w3.org/2001/XMLSchema-instance" xmlns:p="http://www.springframework.org/schema/p"
xmlns:context="http://www.springframework.org/schema/context" xmlns:tx="http://www.springframework.org/schema/tx"
xmlns:aop="http://www.springframework.org/schema/aop"
xsi:schemaLocation="
http://www.springframework.org/schema/beans
http://www.springframework.org/schema/beans/spring-beans.xsd
http://www.springframework.org/schema/context
http://www.springframework.org/schema/context/spring-context.xsd
http://www.springframework.org/schema/tx
http://www.springframework.org/schema/tx/spring-tx.xsd
http://www.springframework.org/schema/aop
http://www.springframework.org/schema/aop/spring-aop.xsd">


<!---加载数据属性文件-->
<!--通过实体PropertyPlaceholderConfigurer将属性文件中的值提取出来-->
<bean class="org.springframework.beans.factory.config.PropertyPlaceholderConfigurer">
<!--如果资源没有被找到,不报错-->
<property name="ignoreResourceNotFound" value="true"/>
<!--从路径中加载配置文件集合,配置文件就是集合的值-->
<property name="locations">
<list>
<value>classpath:db.properties</value>
</list>
</property>
</bean>

<!--配置数据源-->
<bean id="dataSource" class="com.alibaba.druid.pool.DruidDataSource">
<property name="driverClassName" value="com.mysql.jdbc.Driver"/>
<property name="url" value="jdbc:mysql://ip address:3306/ssmdb?characterEncoding=utf-8"/>
<property name="username" value="rack"/>
<property name="password" value="123456"/>
</bean>

<!--配置mybatis与spring整合-->
<bean id="sessionFactory" class="org.mybatis.spring.SqlSessionFactoryBean">
<property name="dataSource" ref="dataSource"/>
<property name="mapperLocations" value="classpath:mapper/*.xml"/>
<property name="typeAliasesPackage" value="com.deployee.pojo"/>
</bean>

<!--代理对象-->
<bean id="scannerConfigurer" class="org.mybatis.spring.mapper.MapperScannerConfigurer">
<!--将session对象工厂引入-->
<property name="sqlSessionFactory" ref="sessionFactory"/>
<!--接口位置-->
<property name="basePackage" value="com.deployee.mapper"/>
</bean>

<!--扫描所有包-->
<context:component-scan base-package="com.deployee.*"></context:component-scan>
<!--自动代理-->
<aop:aspectj-autoproxy></aop:aspectj-autoproxy>
</beans>

创建各个java文件

创建com.deployee.pojo包
  • 创建User文件
1
2
3
4
5
6
7
8
9
10
11
12
13
14
15
16
17
18
19
20
21
22
23
24
25
26
27
28
29
30
31
32
33
34
35
36
37
38
39
40
41
42
43
44
45
46
47
48
49
50
51
52
53
54
55
56
57
package com.deployee.pojo;

import java.io.Serializable;

public class User implements Serializable {
private Integer id ;
private String username ;
private String password ;

public User() {
}

public User(String username, String password) {
this.username = username;
this.password = password;
}

public User(Integer id, String username, String password) {
this.id = id;
this.username = username;
this.password = password;
}

public Integer getId() {
return id;
}

public void setId(Integer id) {
this.id = id;
}

public String getUsername() {
return username;
}

public void setUsername(String username) {
this.username = username;
}

public String getPassword() {
return password;
}

public void setPassword(String password) {
this.password = password;
}

@Override
public String toString() {
return "User{" +
"id=" + id +
", username='" + username + '\'' +
", password='" + password + '\'' +
'}';
}
}

创建com.deployee.mapper包
  • 创建UserMapper文件
1
2
3
4
5
6
7
8
9
package com.deployee.mapper;

import com.deployee.pojo.User;

import java.util.List;

public interface UserMapper {
List<User> list();
}
创建com.deployee.service包
  • 创建UserService文件
1
2
3
4
5
6
7
8
9
10
package com.deployee.service;

import com.deployee.pojo.User;

import java.util.List;

public interface UserService {
List<User> list();
}

创建com.deployee.service.impl包
  • 创建UserServiceImpl文件
1
2
3
4
5
6
7
8
9
10
11
12
13
14
15
16
17
18
19
20
21
22
23
24
25
26
27
28
29
30
31
32
33
34
35
36
37
38
39
package com.deployee.service.impl;

import com.deployee.mapper.UserMapper;
import com.deployee.pojo.User;
import com.deployee.service.UserService;
import org.springframework.beans.factory.annotation.Autowired;
import org.springframework.stereotype.Service;

import javax.annotation.PostConstruct;
import javax.annotation.PreDestroy;
import java.util.List;

@Service
public class UserServiceImpl implements UserService {

@Autowired
private UserMapper userMapper = null ;

/**
* 这个注解是用来实现在对象加入IOC容器的时候实现数据的初始化
*/
@PostConstruct
public void init(){
System.out.println("初始化数据");
}

@Override
public List<User> list() {
return userMapper.list();
}

/**
* 这个注解是对象在IOC容器销毁时执行
*/
@PreDestroy
public void destroy(){
System.out.println("销毁数据");
}
}
创建com.deployee.controller包
  • 创建UserController文件
1
2
3
4
5
6
7
8
9
10
11
12
13
14
15
16
17
18
19
20
21
22
23
24
25
26
27
28
29
30
31
32
33
34
35
36
37
38
package com.deployee.controller;


import com.deployee.pojo.User;
import com.deployee.service.UserService;
import org.springframework.beans.factory.annotation.Autowired;
import org.springframework.stereotype.Controller;
import org.springframework.web.bind.annotation.GetMapping;
import org.springframework.web.bind.annotation.RequestMapping;
import org.springframework.web.bind.annotation.ResponseBody;
import org.springframework.web.bind.annotation.RestController;

import java.util.List;

/**
* @RestController : 等同于@Controller@ResponseBody这两个的功能
*/
//@RestController
@Controller
@RequestMapping(value = "user")
public class UserController {
@Autowired
private UserService us = null ;

/**
* 请求数据
* @return
*/
@GetMapping("list")
// @RequestMapping(value = "/list")
@ResponseBody
public List<User> list(){
List<User> list = us.list();
System.out.println("返回的数据:"+list);
return list ; //返回的是json格式的数据,因为有@ResponseBody这个注解
}
}

本地测试

创建jsp文件
  • 创建index.jsp文件
1
2
3
4
5
6
7
<%@ page contentType="text/html;charset=UTF-8" language="java" isELIgnored="false" %>
<html>
<body>
<h2>Hello World!</h2>
<jsp:forward page="${pageContext.request.contextPath}/user/list.action"></jsp:forward>
</body>
</html>
  • 进入浏览器测试(输入localhost:8080)
1
[{"id":1,"password":"123456","username":"张三"},{"id":2,"password":"12345678","username":"李四"},{"id":3,"password":"1876543","username":"王五"}]
  • 测试成功

SSM项目部署到远端服务器

配置pom文件
  • 增加一段代码,使得部署到远端服务器后能够像在本地idea里访问一样正常的访问
1
2
3
4
5
6
7
8
9
10
11
<resources>
<resource>
<directory>src/main/java</directory>
<includes>
<include>**/*.xml</include>
</includes>
</resource>
<resource>
<directory>src/main/resouces/</directory>
</resource>
</resources>
编译项目
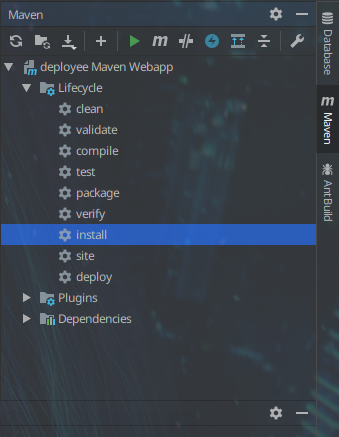
  • 使用maven管理项
    编译安装target命令
    deployee6
  • 打开idea终端,使用maven命令
1
2
3
mvn clean  #清理生成的编译项目
mvn package #生成target项目
mvn install #编译生成target项目,比package命令更完善
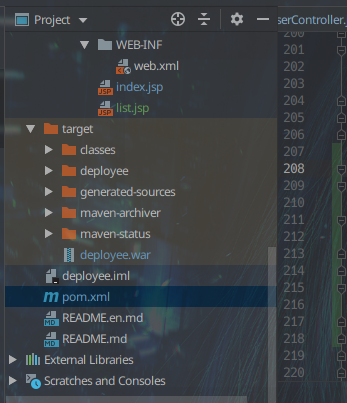
  • 最终得到项目打包war
    deployee7
复制war包到远端
  • 复制deployee.war路径
1
2
3
4
scp scp /home/share/workspace/deployee/target/deployee.war root@ip address:/usr/local/tomcat/apache-tomcat-8.0.9/webapps
cd /usr/local/tomcat/apache-tomcat-8.0.9/bin
./shutdown.sh
./startup.sh
远端测试
  • 进入浏览器测试(输入ip address:8080)
1
[{"id":1,"password":"123456","username":"张三"},{"id":2,"password":"12345678","username":"李四"},{"id":3,"password":"1876543","username":"王五"}]
  • 测试成功
文章作者: rack-leen
文章链接: http://yoursite.com/2019/05/29/Java/Java%E6%A1%86%E6%9E%B6/SSM/SSM%E9%A1%B9%E7%9B%AE%E6%95%B4%E5%90%88%E4%B8%8E%E5%8F%91%E5%B8%83/
版权声明: 本博客所有文章除特别声明外,均采用 CC BY-NC-SA 4.0 许可协议。转载请注明来自 rack-leen's blog
打赏
  • 微信
  • 支付宝

评论