原型模式
定义
Specify the kinds of objects to create using a prototypical instance , and create new objects by copying this prototye.
用原型实例指定创建对象的种类,并且通过拷贝这些原型创建对象。
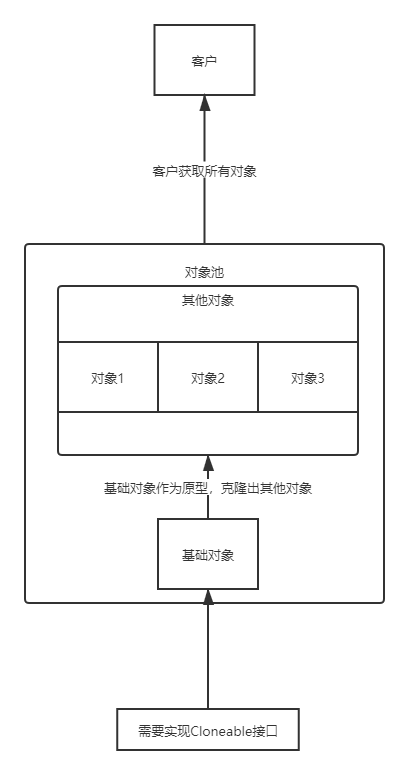
原型模式示意图
![原型模式]()
流程
- 首先创建一个实体类,这个实体类需要实现Cloneable接口的clone()方法,这样能拥有克隆能力。
- 然后创建一个对象,根据客户端需要,以创建的这个对象作为原型,克隆多个需要的对象,然后通过set方法将这些克隆的对象改为自己需要的对象。
需求
我们为幼儿园小朋友发成绩表,他们的年龄和成绩都一样,我们只需要改成绩表的名字就行了。
代码实现
- 创建一个学生类,作为拷贝原型
1
2
3
4
5
6
7
8
9
10
11
12
13
14
15
16
17
18
19
20
21
22
23
24
25
26
27
28
29
30
31
32
33
34
35
36
37
38
39
40
41
42
|
@Data
@ToString
public class Student implements Cloneable {
private String name ;
private String age ;
private String score ;
private ArrayList<Student> students = new ArrayList<>();
private final ArrayList<Student> finalStudent = new ArrayList<>();
public Student(String name, String age, String score) {
this.name = name;
this.age = age;
this.score = score;
System.out.println(name + "创建成功");
}
public Student clone() {
System.out.println("学生拷贝成功");
Student student = null ;
try {
student = (Student) super.clone() ;
this.students = (ArrayList<Student>) this.students.clone();
} catch (CloneNotSupportedException e) {
e.printStackTrace();
}
return student ;
}
}
|
- 开始发成绩表了
1
2
3
4
5
6
7
8
9
10
| public class Test {
public static void main(String[] args) {
Student rack = new Student("rack", "12", "16");
Student clone = (Student) rack.clone();
clone.setName("leen");
System.out.println(rack);
System.out.println(clone);
}
}
|
原型模式扩展
为原型模式增加一个原型管理器,用来管理原型的创建。
需求
现在我们要创建一个学校,学校里面有教师,学生等实体,我们需要以一个教师和学生作为原型,创建出多个教师和学生。
代码实现
- 创建一个学校接口,里面放入clone方法,使得所有实现它的实体都需要重写clone,拥有复制的能力。
1
2
3
| public interface School extends Cloneable {
public School clone();
}
|
- 创建一个学生类,实现学校接口。
1
2
3
4
5
6
7
8
9
10
11
12
13
14
15
16
17
18
19
20
21
22
23
24
25
26
27
28
29
30
31
32
33
34
35
36
37
38
39
| @Data
@ToString
public class Student implements School {
private String name ;
private String age ;
private String score ;
private ArrayList<Student> students = new ArrayList<>();
private final ArrayList<Student> finalStudent = new ArrayList<>();
public Student(String name, String age, String score) {
this.name = name;
this.age = age;
this.score = score;
System.out.println(name + "创建成功");
}
public Student clone() {
System.out.println("学生拷贝成功");
Student student = null ;
try {
student = (Student) super.clone() ;
this.students = (ArrayList<Student>) this.students.clone();
} catch (CloneNotSupportedException e) {
e.printStackTrace();
}
return student ;
}
}
|
- 创建一个教师类
1
2
3
4
5
6
7
8
9
10
11
12
13
14
15
16
17
18
19
20
21
22
23
24
| @Data
@ToString
public class Teacher implements School {
private String name ;
private String age ;
private String subject ;
public Teacher(String name, String age, String subject) {
this.name = name;
this.age = age;
this.subject = subject;
}
public Teacher clone(){
Teacher teacher = null ;
try {
teacher = (Teacher) super.clone();
} catch (CloneNotSupportedException e) {
e.printStackTrace();
}
return teacher ;
}
}
|
- 创建一个原型管理器,我们如果需要更多的职位,比如校长等,我们直接通过原型管理器将原型对象加入进去,使其能拥有复制能力。
1
2
3
4
5
6
7
8
9
10
11
12
13
14
15
16
17
18
19
20
21
22
23
24
25
26
27
| public class PrototypeManager {
public Map<String , School> map = new HashMap<>();
public void add(String key , School value){
this.map.put(key , value);
}
public School get(String key){
School school = null;
try {
school = this.map.get(key);
}catch (Exception e){
e.printStackTrace();
}
return school ;
}
}
|
- 场景实现
1
2
3
4
5
6
7
8
9
10
11
12
13
14
15
16
17
18
19
| public class Test {
public static void main(String[] args) {
PrototypeManager prototypeManager = new PrototypeManager();
prototypeManager.add("teacher" , new Teacher("teacher1" , "21" , "数学"));
Teacher teacher1 = (Teacher)prototypeManager.get("teacher");
Teacher teacher2 = teacher1.clone();
teacher2.setName("teacher2");
prototypeManager.add("student" , new Student("student1" , "12" , "45"));
Student student1 = (Student)prototypeManager.get("student");
Student student2 = student1.clone();
student2.setName("student2");
System.out.println(teacher1);
System.out.println(teacher2);
System.out.println(student1);
System.out.println(student2);
}
}
|
应用场景
- 一个对象有多个修改者。
- 类初始化需要很多资源,我们要优化的话,就直接克隆一个对象,不需要再创建。
- 通过new产生一个对象很繁琐,为了简化,我们直接copy就行了。
原型模式就像我们复制粘贴一样,文章大体不变,只变一些细节。
原型模式一般与工厂模式一起用;原型模式已经和java融为一体,随手就能用。
原型模式的优点和注意事项
优点
- 原型模式是在内存二进制流的拷贝,比直接new一个对象消耗性能少。
- 在内存中拷贝,构造函数不会被执行,这就逃避构造函数的约束。
注意事项
- 如果实体类中只有基本数据类型和string,就用浅拷贝进行克隆。
- 如果实体类中还有数组和引用,就需要单独为它们进行深拷贝。
- 使用clone后,克隆一个对象是直接拷贝二进制流,不会执行构造函数。如果需要使用构造函数,就不能使用原型模式。
- 变量前加了final关键字,就不能使用clone进行拷贝。